Wednesday, November 3, 2010

@ignore SpecFlow scenario

When you have all SpecFlow scenarios working, you always run them.
However, sometimes tests are incomplete or just broken. The correct course of actions is to fix or complete tests, but often you just don't have time (yeah, you need to deliver the product next day, but it will take two days to fix the test). In this case you may use a predefined tag, @ignore with SpecFlow scenarios. Adding this tag to a scenario will mark this test is ignored. That will allow you to pass tests without having ignored tests

For instance, you have a scenario which doesn't work yet

Scenario: Create User
Given ....


Running it as is causes a test (and the whole test suite) to fail


So once you modify as below


@ignore
Scenario: Create User
Given ....


You have your tests passed (or, more precisely, not failed).


P.S. Ignoring an issue is just a way to postpone its resolution, you'd need to fix to this scenario anyway. However, if this scenario isn't needed, just delete it.

Monday, August 2, 2010

Given-When-Then with SpecFlow

I think that key articles for understanding how BDD tests should be written are
Given-When-Then
and The Truth about BDD
I really recommend to read those articles if you're involved into any BDD testing (whether they use SpecFlow or not)

Thursday, July 8, 2010

SpecFlow scenario outlines

As many people know, SpecFlow is a tool that allows to write test scenarios in a human readable form and then run them using NUnit (other testing frameworks are also possible).

So, scenarios for SpecFlow typically look like below(I use Calculator as the simplest sample):


Scenario: TC1 Add two numbers
Given I have entered 1 into the calculator
And I have entered 2 into the calculator
When I press add
Then the result should be 3 on the screen

Scenario: TC2 Add two numbers
Given I have entered 2 into the calculator
And I have entered 2 into the calculator
When I press add
Then the result should be 4 on the screen


Obviously, In many cases number of scenarios for a single feature will be more that two, and those scenarios may differ only by values that are set as parameters.
And scenario outlines allow to define a scenario outline and then set a table of all parameters that should be passed to individual scenarios. Thus, the scenarios above may be transformed into:


Scenario Outline: TC5
Given I have entered <x> into the calculator
And I have entered <y> into the calculator
When I press add
Then the result should be <result> on the screen

Scenarios: addition
| x | y | result|
| 1 | 2 | 3|
| 2 | 2 | 4|

The scenario outline provides the same as individual scenarios (it will be the same number of tests with the same output). Moreover, when SpecFlow steps (which are defined in C#) are set for individual scenarios, they may work for Scenario outlines with no modifications. For instance, to make scenario outline above working , I didn’t write any line of code, I just changed the SpecFlow scenarios in the text editor. Using similar approach most sets of repetitive tests may be transformed to Scenario outlines at any time when it's needed.

More details on Scenario outlines are available at:
scenario outlines

Friday, July 2, 2010

Notepad++ to recognize custom file extensions

As many others, I am using Notepad++ as an editor to modify many XML files, which may have different extensions than XML. Such files may be configuration files for ASP.NET or MSBuild files. By default, when I opened them in Notepad++, I saw no syntax highlighting, everything was just black and white. In order to turn the highlighting on, I needed to explicitly select XML as a language each time when I opened such files.

However, using the following link, I just set extensions to what I needed.

http://www.mattblodgett.com/2007/11/notepad-tip-syntax-highlighting-for.html

So I have those files immediately recognize as XMLs when I open them

Thursday, April 22, 2010

SharePoint Server 2010 goes RTM

SharePoint Server 2010 RTM is available for MSDN subscribers at
MSDN subscription download area

Available to Levels: VS Pro with MSDN Premium (Empower); Developer AA; VS Premium with MSDN (MPN); VS Pro with MSDN Premium (MPN); MSDN Universal (VL); BizSpark Admin; BizSpark; VS Ultimate with MSDN (VL); VS Premium with MSDN (VL); VS Premium with MSDN (Retail); VS Ultimate with MSDN (Retail);

A Russian version of SharePoint Server 2010 is available at TechNet

Available to Levels: TechNet Plus SA Media; TechNet Plus (Retail); TechNet Direct (Retail); TechNet Plus (VL); TechNet Plus Direct (VL); TechNet Cert Partner; TechNet Gold Cert Partner; TechNet Plus Consumer Service Professional Pilot; TechNet Standard (VL); TechNet Standard (Retail);

Friday, April 16, 2010

Generate New GUID by PowerShell

It's simple and easy to get GUID using PowerShell.
Just type the following line in PowerShell command prompt:
[System.Guid]::NewGuid().toString()
If you need GUID wrapped in curly braces modify the script line to:
"{"+[System.Guid]::NewGuid().toString()+"}"

For me the typical action after getting a GUID is to copy it to the clipboard so the following snippet is my favorite.
$guid="{"+[System.Guid]::NewGuid().toString()+"}"
[Reflection.Assembly]::LoadWithPartialName("System.Windows.Forms")
$dataObject = New-Object windows.forms.dataobject
$dataObject.SetData([Windows.Forms.DataFormats]::UnicodeText, $true, $guid)
[Windows.Forms.Clipboard]::SetDataObject($dataObject, $true)
write-host The following GUID has been copied to the clipboard: $guid
So once you run the last script you have a new GUID in the clipboard. As for me - that what I call convenient

Friday, April 9, 2010

Hello PowerShell!!

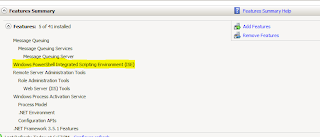
As soon as new Microsoft Products are delivered with PowerShell SnapIns it makes more sense to put a toe into programming it. I have Windows Server 2008 R2 as a main platform for development. On Windows Server 2008 R2 Windows PowerShell ISE isn't running by default. To turn it on, a corresponding feature, called Windows PowerShell ISE should be added in Roles and Features. To do this:
1) Open Windows Start menu.
2) Right click on Computer
3) Select Features
4) Add "Windows Powershell Integrated Script Environment" feature
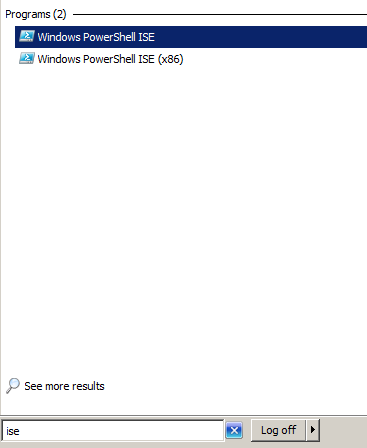
When ISE is added you could just open Start menu and type "ISE". If you have Windows Vista, Windows 7 or Windows Server 2008 you'll a couple of programs displayed.


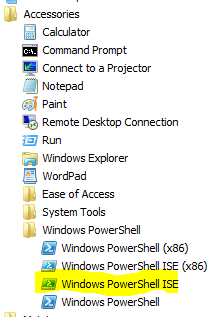
Alternatively, you could just select it though Start/Accessories/PowerShell menu
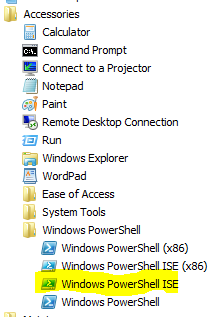
Right click on it and select "Run as an administrator". For some tasks it's not needed, but some just fail without trying to elevate permissions.
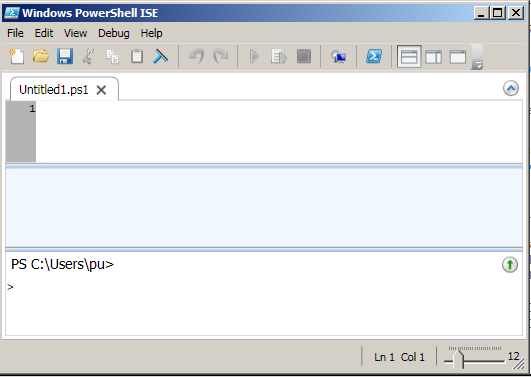
When you have ISE opened you'll see a windows separated to 3 areas.
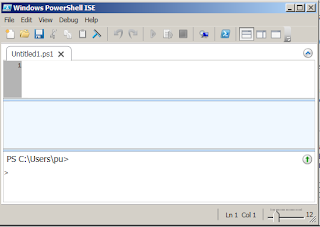
The top part (Script Pane) allows to edit a script and run it at once The middle (Output Pane) shows PowerShell output and the lower one (Command Pane) allows to enter commands interactively, one by one. To make the intro complete we'll run a Hello World like program to be sure that we have really started.
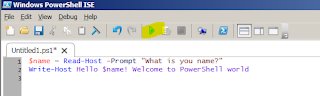
So, copy the following two lines to the Script Pane (top one)

name = Read-Host -Prompt "What is you name?" Write-Host Hello $name! Welcome to PowerShell world
and then press "Run"
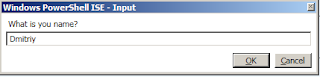
you'll see a prompt asking for a name. Enter your name and press ok
Then you'll see that a middle sections contains a prompt welcoming you to the world of PowerShell.

After running a script all variables are stored in the session and you could access them through the immediate window
So if you put
$name
into the Command Pane and press Enter

you'll see what name was entered previously

As any language, PowerShell has much more to learn, but it's a scripting language that worth investing your time if you work on Windows Platform